Every mom loves to look at adorable pictures of her kids and the sweet crafts her children have made. This is an origami Mother’s Day projects which can be created to combine paper folding and a favorite photo for a special gift that Mom is sure to cherish. These origami flower photo frame is quick to make, very inexpensive, and can be enjoyed long after Mother’s Day has passed.
 |
| Origami photo frames |
 |
| Origami photo frames |
 |
| Origami photo frames |
Sunflower
photo frame
Sunflowers
have been a popular subject for artists and craftspeople since Vincent van Gogh
began his legendary series of still life paintings in Paris in 1887. Sunflowers
are a symbol of friendship and gratitude, which makes them appropriate for many
types of creative projects.
The
origami sunflower in this tutorial is an example of modular origami. Modular
origami models are created when several identically folded units are joined
together to make one large finished form.
Modular
origami models are good for children as well as adult beginners because you can
make something very impressive just by knowing a few simple folds.
|
| Origami photo frames |
Modular
origami models are good for children as well as adult beginners because you can
make something very impressive just by knowing a few simple folds.
The
flower in this tutorial is made using eight sheets of yellow notepaper
measuring 3 1/2 inches x 3 1/2 inches. You may use square origami paper that is
yellow on the front and white on the back side if you wish, but you will need
to start with the white side face up when completing Step 1.
 |
| Origami photo frames |
1. Fold
an Organ Base
To
begin, make an organ base. This is a common origami form used in projects such
as the origami Easter egg cup. Fold your paper in half
vertically, then unfold. Fold your paper in half horizontally. Fold the left
and right sides in to meet the middle crease. Squash fold the flaps on the left
and right sides so your paper looks like the photo to the left.
Make
sure your squash folds are even. If your center creases don't line up after the
squash fold is complete, this will throw off the alignment of the rest of the
folds.
 |
| Origami photo frames |
2. Turn
the Flaps Over
Fold
the flaps over so your paper looks like the model in the photo to the left.
 |
| Origami photo frames |
3. Fold
the Paper in Half
Fold
the paper in half so it looks like the model in the photo to the left.
 |
| Origami photo frames |
4. Make
a Guide Crease
Bring
the top flap down to make a crease as shown in the photo to the left. Unfold
 |
| Origami photo frames |
5. Fold
the Bottom Corner
Fold
the bottom corner up to meet the crease you have just made. It may be hard to
fold the paper at this point, because there will be multiple layers. Take your
time to ake your folds are accurate.
 |
| Origami photo frames |
6.
Complete Your Petal
Step
6A:
Fold the top layer down to complete your petal.
Step
6B:
Repeat Step 1 to Step 6A until you have a total of eight identical petals.
 |
| Origami photo frames |
7.
Assemble Your Origami Sunflower
Open
the top flap of one petal and glue another petal inside it. Continuing adding
petals until you've completed your flower.
A
glue stick works best for assembling your origami sunflower. Liquid glue may
cause unsightly bubbles in your paper when it dries.
If
desired, add a button, rhinestone, or chipboard circle to make a decorative
center for the flower. If you enjoy doodling, you could also draw a decorative
center onto your flower with a brown or black permanent marker.
 |
| Origami photo frames |
8.
Sunflower Origami Photo Frame
On
its own, the origami sunflower is a pretty accent for a handmade greeting card
or a scrapbook page. You can also turn it into a picture frame by folding the origami lotus flower frame from 6 inch x 6 inch
brown origami paper or colored construction paper and gluing the finished frame
into the middle of your completed sunflower.
for more information
lotus flower photo frame
To
make your origami Mother's Day project, you will need one sheet of 12 inch x 12
inch scrapbook paper. Lightweight paper is ideal for this project because it
will need to be folded several times. Thick paper becomes hard to manipulate
when there are several layers in the project. If you do use a thicker paper for
the project, it might be helpful to keep a straight edge nearby to sharpen the
folds as you work through each step.
|
| Origami photo frames |
You
can choose a solid color, a subtle watercolor pattern, or a pretty damask
design for your flower. Try to pick something that picks up the colors that are
in the photo you want to frame. If this is not possible, use image editing
software to make a black and white copy of your picture. This will allow you to
use whatever colors you wish for your origami flower.
Children
ages eight and up should be able to make this project with minimal adult
assistance.
 |
| Origami photo frames |
1. Make a Blintz Base
To
begin your project, you will need to create a blintz base. Fold the paper diagonally to make a
paper triangle. Crease well, the unfold. Fold the paper along the opposite
diagonal. Crease well, then unfold. Open your paper to reveal an “X” crease
pattern. Fold each of the corners in to the center. When you’re finished, your
project should look like the photo to the left.
 |
| Origami photo frames |
2. Double Blintz
Without
unfolding the blintz you did in the last step, fold each of the corners in to
the center once more. When you’re finished, your project should look like the
photo to the left.
 |
| Origami photo frames |
3.
Triple Blintz
Without
unfolding the blintz you did in the last step, fold each of the corners to the
center a final time. At this point, it’s normal for the paper to be stiff and a
bit hard to fold. Use a straight edge to make creases if needed. When you’re
finished, your origami flower should resemble the photo to the left.
 |
| Origami photo frames |
4. Make
the Origami Lotus Flower Petals
Partially
unfold the last flaps you created. When you pull them out from the center
towards the side of the paper, roll them round the barrel of a pencil or your
finger to help curl into the desired petal shape.
 |
| Origami photo frames |
5.
Shape Your Origami Lotus Blossom
Bend
each of the outermost triangles (the ones that are between the flaps you just
unfolded) slightly back. Crease well, then push all of the sides in to shape
your project into an origami lotus flower.
 |
| Origami photo frames |
6.
Complete Your Origami Lotus Flower Photo Frame
Add
the photo to the center of your origami lotus flower photo frame. I used one of
my son's wallet size school pictures, but you could make your image a heart or
circle shape if you prefer. Tape or glue the photo into place.
Use
double sided tape to attach the origami lotus blossom to a jar lid. Tape that
is sold for use with scrapbooking embellishments, such as Provo Craft’s Terrifically Tacky tape is
ideal for this project because it provides a very strong bond without wrinkling
the paper. I used the back of an empty Altoid container for my frame. Any type
of lid will work as long as it's smaller than your frame and has tall enough
sides to be used as a hook for hanging your photo on the wall.
Your
origami photo frame is now finished.
for more information
An origami flower picture frame is a beautiful and inexpensive way to display your favorite photos. Frames also make lovely handmade gifts for friends and family.
This origami flower picture frame that I've designed uses eight sheets of matching square origami paper and one sheet of the same size square origami paper in a coordinating color. The flower in this tutorial was made using 6 inch x 6 inch origami paper.
|
| Origami photo frames |
If
you don't have enough origami paper that is the right size, the red circle
pattern in the About Origami Free Printable Origami Paper slideshow would work
well for this project.
 |
| Origami photo frames |
1. Create a Blintz Base
The
first step in making this origami flower picture frame is to create a blintz
base. A blintz base is one of the most common origami base forms. Base forms are the building blocks of making
origami models. In instructions for intermediate or advanced projects, the
author will often simply refer to the base form by name instead of explaining
how to fold it. If you are serious about learning origami, it's helpful to work
on learning the names for the different base forms as you encounter them,
To
make a blintz base, start with the patterned side of your paper face down. Fold
the paper in half diagonally. Unfold. Fold the paper in half diagonally in the
other direction. Unfold. Fold each corner in to meet the intersection of the first
two creases you created. When you're finished, your paper should look like the
photo to the left.
 |
| Origami photo frames |
2. Start Your Flower Petal
Fold
two of the opposite corners in to meet the middle crease, as indicated in the
photo to the left.
 |
| Origami photo frames |
3. Finish Your Flower Petal
Fold
each of the two sides you folded in the previous step in once more. Fold them
so they are almost touching the middle crease. Do not fold all the way to the
middle crease, as this will result in an awkward gap in the flower petal due to
the movement in the layers of paper when the flower is finished.
Your
first flower petal is now complete. Fold eight more identical petals.
 |
| Origami photo frames |
4. Start Assembling the Flower
To
make your origami flower, you will need to layer two petals together to form a
cross. Glue one petal on top of the other as shown in the photo to the left.
 |
| Origami photo frames |
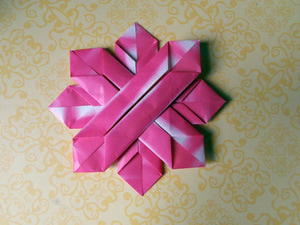
5. Add the Second Layer of the
Flower
Add
the second layer by joining two more petals as shown in the photo to the left.
 |
| Origami photo frames |
6. Finish the Origami Flower
Repeat
Step 4 and Step 5 to create a third and fourth layer for the flower.
Fold
the ends of the last two petals you added to the flower up slightly to give it
a little more dimensional.
 |
| Origami photo frames |
7. Start Your Origami Picture
Frame
Now,
you will need to make the center picture frame embellishment for your flower.
Use your remaining sheet of coordinating origami paper to a blintz base
following the instructions in Step 1. Begin with the colored side of the paper
face up.
Flip
the paper over and fold the corners in to the middle once more. When you are
finished with this step, your project should look like the one in the photo to
the left.
 |
| Origami photo frames |
8. Complete Your Origami Picture
Frame
Flip
your paper over once more. Bring each of the four inner flaps back to form
small triangles that almost touch the edges of the paper. Slip your photo in to
the photo corners created by the bottom layer of the paper.
|
| Origami photo frames |
9. Assemble the Final Model
Glue
your frame to the center of your origami flower. You can use your origami
flower picture frame as an embellishment for an origami gift box or add a small
magnet to the back and hang it on your refrigerator.
for more information
Its really nice blog post for craft and design. For home decoration we can use all these design.....thank you for nice post.
ReplyDeleteIts awesum
ReplyDelete