Decorating
your home with photos of your family and friends is a great way to inject a bit
of personality into your living space. Instead of spending a ton of money on
designer picture frames, however, consider folding a few cute origami frames
for your favorite photos. They can easily be customized by choosing paper to
match your home décor.
 |
| origami picture frame |
The
project in this tutorial was created using 6 inch by 6 inch origami paper and
has an opening that measures 4 ¼ inches by 4 ¼ inches. Adjust the size of the
paper to fit your photo. You will need four identical sheets of paper for the
project.
The
paper used in this tutorial has a green watercolor pattern on the front side
and is a solid green on the back. If you would like a more dramatic looking
frame, use paper that is white on the back side or has a contrasting color on
the back. Skip step 4 and simply fold the center flap up to reveal the back
side of the paper. When you're finished, the contrasting color on the back side
of your origami paper will show up on the four innermost triangles of the
finished frame
.
 |
| origami picture frame |
1. Create a Paper Triangle
Begin
your origami picture frame by placing your paper face up on the table. Fold the
paper to create a triangle as shown in the picture to the left.
 |
| origami picture frame |
2. Fold the Corner Up
Turn
the paper so the long end of your triangle is facing the top of your workspace.
Fold the bottom corner up to the top edge as shown in the photo to the left.
 |
| origami picture frame |
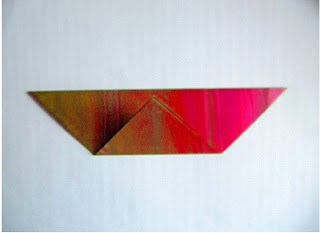
3. Fold the Sides Down
Fold
the right corner of the paper downward so the top edge meets the right edge of
the folded up bottom corner. Repeat with the left corner of the paper. When
you're finished with this step, your origami picture frame should look like the
photo to the left.
 |
| origami picture frame |
4. Tuck in the Flaps
Unfold
the center upper flap and tuck it inside the model as shown in the photo to the
left. Unfold the other center flap, then tuck it in as well.
When
you're finished, repeat the steps so you have a total of four identically
folded
 |
| origami picture frame |
5. Connect the Units of Your
Modular Origami Frame
Insert
the right point of the first unit inside the left point of the second unit.
Repeat until all of the units are connected. If you're worried about the
durability of your frame, add a bit of glue to the right point of the first
unit before connecting it with the second unit.
 |
| origami picture frame |
6. Finish Your Origami Picture Frame
To
finish your origami frame, add a photo to the back. You can either cut the
photo so the image slips inside the pockets you've created or simply tape it to
the back of your project.
This
frame design is very versatile. Modular origami frames can be used to decorate
your home or added to scrapbook pages. Smaller frames can be turned into
refrigerator magnets or folded from holiday themed patterned paper to make
origami Christmas tree ornaments. If you fold multiple frames and string them
together with a thick ribbon, you can create a colorful photo banner for a
birthday party or holiday celebration. Challenge yourself to be creative and
see what uses you can find for this simple origami design!
for more information
No comments:
Post a Comment