Wednesday 10 June 2015

Recycled Book Page Craft Photo Frame


If you're looking for cool crafts to make, you can't go wrong with a modular origami picture frame made from recycled book pages. Modular origami involves joining together identically folded units to create one final project. Glue or tape is not traditionally used in modular origami, although some newer designs do use adhesives for added stability.

Recycled book page craft photo frame
The origami book page picture frame featured in this tutorial is an original design I created to display some of my favorite photos in my office.
Book pages make great free material for paper folders. Although you wouldn't want to take apart a copy of a prized book from your home library, crafts with books give titles that would otherwise end up in the trash a new life.
The book I used for my project had a loose binding that I only discovered after buying it at a local thrift store. Since the binding was already loose, it did not take much work to separate the pages.
Recycled book page craft photo frame

1.  Create Square Origami Paper
The first step in recycled book crafts is to cut your paper to the right size. To make a square sheet of origami paper, simply fold the top left corner of your book page down so it is flush with the right side of the paper. Unfold, then fold the right corner corner of your paper down so it is flush with the left side of the paper. Fold the bottom strip of paper up, then unfold the paper completely. Use these creases to trim your paper into a square as shown in the photo to the left. 

Recycled book page craft photo frame

2.  Make an Origami Balloon Base
Begin with your paper placed so the two valley fold creases that form an "X" are directly in front of you. Flip the paper over. Fold the paper in half horizontally so that you make a crease that interests the two diagonal creases. This crease is called a mountain fold. Flip the paper back to the original position. Collapse the paper to form a balloon or waterbomb base as indicated in the photo to the left.
 
Recycled book page craft photo frame

3.  Fold the Left Side Up
Fold the left side of the paper up as shown in the photo to the left.

Recycled book page craft photo frame

4.  Finish Your Unit
Step 4A: the flap you created in the previous step to make a small square like the one in the photo to the left. This is the first unit of your frame.
Step 4B: Repeat Step 1 through Step 4A to make a total of four identically folded units.
Recycled book page craft photo frame

5.  Connect the First Two Units
To start assembling your book origami picture frame, place the first two units in front of you as shown. Slide the unit on the left into the unit on the right as far as it will go.


Recycled book page craft photo frame

6.  Connect the Third and Fourth Units
Add the third and fourth units in the same fashion to form the base of your book origami picture frame.
Recycled book page craft photo frame

7.  Create Photo Corners
Fold all of the flaps in the middle squares back to make small triangles as shown in the photo to the left. 
Recycled book page craft photo frame

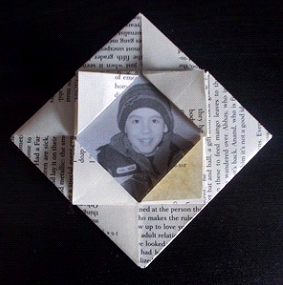
8.  Complete Your Book Origami Picture Frame
Insert your photo. Add a strip of magnetic tape to the back of your frame to hang it on your refrigerator or punch a hole in the top to hang with a strip fo pretty ribbon. This modular origami book page frame also looks pretty as a decoration for a handmade greeting card or an embellishment on a scrapbook page. 

for more information

Tuesday 9 June 2015

paper craft photo frame


This project uses one sheet of square paper. I like to use patterned scrapbook paper so that my finished frame is large enough to make an impact on my home decor. With 12 inch x 12 inch patterned scrapbook paper, your finished origami picture frame measures 6 inch x 6 inch. If you don't mind having a smaller frame or don't have any scrapbook paper available, you can use a large sheet of origami paper for your project.
paper craft photo frame


1.  Make a Blintz Base
To begin making your origami frame, you will need to make a blintz base. This is a basic origami form used in many models, including the lid of my exploding box card design. Review the About Origami definition of blintzing if you are unfamiliar with how to make this base.

paper craft photo frame


2.  Double Blintz
After you've made the blintz base, you need to double blintz the paper by folding each corner into the middle point once more. The paper sometimes is a little harder to fold when you're working with multiple layers, so go over the creases with your fingernail or a metal ruler if needed.


paper craft photo frame

3.  Open the Paper
Unfold the double blintz. Open up the paper so it looks like the photo to the left.


paper craft photo frame

4.  Collapse the Folds
Push down on the back triangle to collapse the paper into two squares. Repeat this process with the bottom of the paper. When you're finished, you should have two triangles on the left and right sides and a middle square base with four separate squares inside it. If folded correctly, your origami picture frame should look like the one in the photo to the left.

paper craft photo frame


5.  Fold the Corners Back
Fold all of the inside corners of the paper back as shown in the photo to the left.


paper craft photo frame


6.  Make Four Triangle Photo Corners
Tuck all of the areas of the paper with white showing under to make four triangular photo corners. If necessary, run over the creases with your fingernail or a metal ruler to make sure they are nice and sharp.

paper craft photo frame


7.  Open the Paper
Open up the top of the paper so it looks like the model in the photo to the left.

paper craft photo frame

8.  Create the Dividing Flaps
Push the left and right corners in. Bring the paper down and flatten it so it looks like the photo to the left. Repeat with the bottom of the model.

paper craft photo frame

9.  Complete Your Origami Picture Frame
Use a glue stick or a bit of double sided tape to secure the large triangle flaps you created in Step 8 to the paper. Cut your two photos to fit the openings in the frame and slip them inside the pockets you've created. If necessary, add a bit of tape or glue to keep the photos from slipping.

Fold the left and right triangles back. This will help your frame stand up when you place it on your desk or a bookshelf. 
paper craft photo frame

for more information


Saturday 6 June 2015

origami picture frame


Decorating your home with photos of your family and friends is a great way to inject a bit of personality into your living space. Instead of spending a ton of money on designer picture frames, however, consider folding a few cute origami frames for your favorite photos. They can easily be customized by choosing paper to match your home décor. 

origami picture frame

 The project in this tutorial was created using 6 inch by 6 inch origami paper and has an opening that measures 4 ¼ inches by 4 ¼ inches. Adjust the size of the paper to fit your photo. You will need four identical sheets of paper for the project.
The paper used in this tutorial has a green watercolor pattern on the front side and is a solid green on the back. If you would like a more dramatic looking frame, use paper that is white on the back side or has a contrasting color on the back. Skip step 4 and simply fold the center flap up to reveal the back side of the paper. When you're finished, the contrasting color on the back side of your origami paper will show up on the four innermost triangles of the finished frame
.
origami picture frame

1.  Create a Paper Triangle
Begin your origami picture frame by placing your paper face up on the table. Fold the paper to create a triangle as shown in the picture to the left.

origami picture frame

2.  Fold the Corner Up
Turn the paper so the long end of your triangle is facing the top of your workspace. Fold the bottom corner up to the top edge as shown in the photo to the left. 

origami picture frame

3.  Fold the Sides Down
Fold the right corner of the paper downward so the top edge meets the right edge of the folded up bottom corner. Repeat with the left corner of the paper. When you're finished with this step, your origami picture frame should look like the photo to the left. 

origami picture frame

4.  Tuck in the Flaps
Unfold the center upper flap and tuck it inside the model as shown in the photo to the left. Unfold the other center flap, then tuck it in as well.
When you're finished, repeat the steps so you have a total of four identically folded
 
origami picture frame

5.  Connect the Units of Your Modular Origami Frame
Insert the right point of the first unit inside the left point of the second unit. Repeat until all of the units are connected. If you're worried about the durability of your frame, add a bit of glue to the right point of the first unit before connecting it with the second unit. 

origami picture frame

6.  Finish Your Origami Picture Frame
To finish your origami frame, add a photo to the back. You can either cut the photo so the image slips inside the pockets you've created or simply tape it to the back of your project.
This frame design is very versatile. Modular origami frames can be used to decorate your home or added to scrapbook pages. Smaller frames can be turned into refrigerator magnets or folded from holiday themed patterned paper to make origami Christmas tree ornaments. If you fold multiple frames and string them together with a thick ribbon, you can create a colorful photo banner for a birthday party or holiday celebration. Challenge yourself to be creative and see what uses you can find for this simple origami design! 

for more information